Can You Upload a Photo for Disabled Persons Railcard Which Board to Use Upload Bootloader to Atmega328 on Breadboard
Learning Examples | Foundations | Hacking | Links
From Arduino to a Microcontroller on a Breadboard
This tutorial explains how to drift from an Arduino lath to a standalone microcontroller on a breadboard. It'due south similar to this tutorial, but uses an Arduino board to program the ATmega on the breadboard.
Unless you cull to use the minimal configuration described at the end of this tutorial, you'll need four components (besides the Arduino, ATmega328, and breadboard):
- a sixteen MHz crystal,
- a 10k resistor, and
- ii 18 to 22 picofarad (ceramic) capacitors.
Notation that these techniques simply piece of work with the Arduino Duemilanove due west/ an ATmega328, not the Arduino Uno (or older Arduino boards w/ an ATmega168).
Burning the BootloaderIf yous accept a new ATmega328 (or ATmega168), y'all'll demand to burn the bootloader onto it. You tin do this using an Arduino lath equally an in-system programme (ISP). If the microcontroller already has the bootloader on it (e.yard. because you took it out of an Arduino board or ordered an already-bootloaded ATmega), yous tin can skip this section. To burn the bootloader, follow these steps:
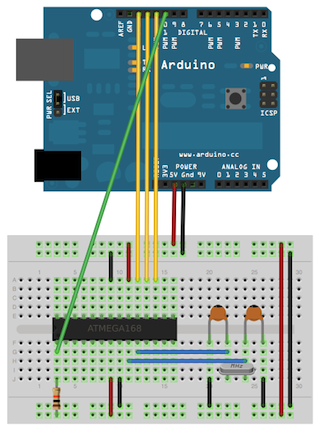
You should only demand to burn the bootloader once. Later on you've washed then, you can remove the jumper wires connected to pins ten, 11, 12, and thirteen of the Arduino lath. | Using an Arduino board to burn down the bootloader onto an ATmega on a breadboard. |
Uploading Using an Arduino Board
Once your ATmega328p has the Arduino bootloader on it, you tin upload programs to it using the USB-to-serial convertor (FTDI chip) on an Arduino board. To do, you remove the microcontroller from the Arduino board so the FTDI chip can talk to the microcontroller on the breadboard instead. The diagram at right shows how to connect the RX and TX lines from the Arduino board to the ATmega on the breadboard. To programme the microcontroller, select "Arduino Duemilanove or Nano w/ ATmega328" from the the Tools > Lath carte du jour (or "ATmega328 on a breadboard (viii MHz internal clock)" if you're using the minimal configuration described beneath). Then upload as usual.
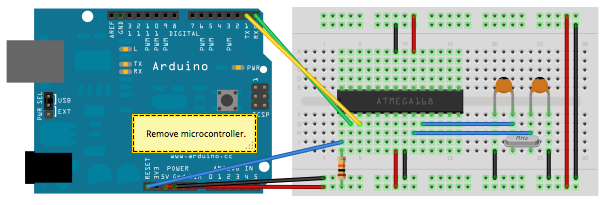
Uploading sketches to an ATmega on a breadboard. Recall to remove the microcontroller from the Arduino lath!
Minimal Excursion (Eliminating the External Clock)
If you don't take the extra 16 MHz crystal and 18-22 picofarad capacitors used in the to a higher place examples, you can configure the ATmega328 to utilize its internal 8 MHz RC oscillator as a clock source instead. (You don't actually need the 10K pullup resistor on the reset pivot either, then we remove it to go a truly minimal configuration.)
You'll need to install back up for an additional hardware configuration:
- Download this hardware configuration archive: breadboard.zip
- Create a "hardware" sub-folder in your Arduino sketchbook binder (whose location you tin can find in the Arduino preferences dialog). If you've previously installed support for additional hardware configuration, you may already accept a "hardware" binder in your sketchbook.
- Motion the "breadboard" folder from the zero archive to the "hardware" sub-folder of your Arduino sketchbook.
- Restart the Arduino software.
- You should run into "ATmega328 on a breadboard (viii MHz internal clock)" in the Tools > Board menu.
Once y'all've done this, you can fire the bootloader and upload programs onto your ATmega328 as described above. Exist certain to select "ATmega328 on a breadboard (viii MHz internal clock)" when burning the bootloader. (If you select the wrong particular and configure the microcontroller to use an external clock, it won't piece of work unless you lot connect one.)
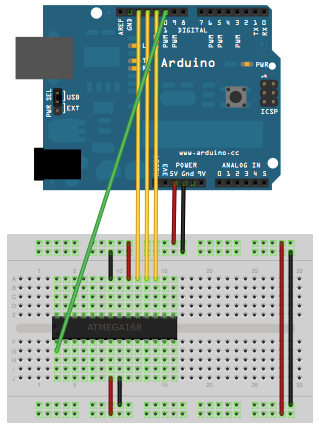
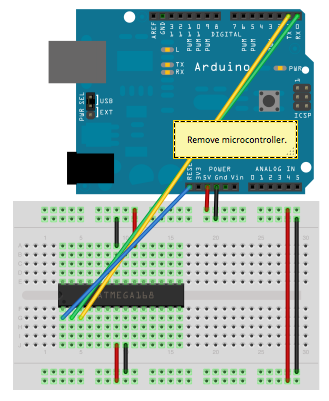
| Using an Arduino lath to burn the bootloader onto an ATmega on a breadboard (w/o an external clock). | Uploading sketches to an ATmega on a breadboard. |
Getting Rid of the Arduino Lath
Once yous've programmed the ATmega on the breadboard, you can eliminate the Arduino. To do and so, you'll need to provide an alternative power supply for the microcontroller. See the standalone Arduino on a breadboard tutorial for details.
Source: https://assiss.github.io/arduino-zhcn/cn/Tutorial/ArduinoToBreadboard.html
0 Response to "Can You Upload a Photo for Disabled Persons Railcard Which Board to Use Upload Bootloader to Atmega328 on Breadboard"
Post a Comment